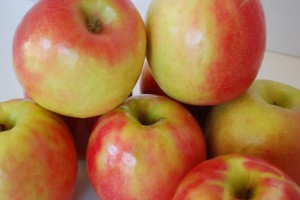
Soft delicately spiced pieces of apple, packed together in a tiny bit of loose clear pink jelly, encased in crisp, flaky pie crust is the way I like apple pie. Over the years, I have used many varieties of apples and I prefer the Pink Lady variety. Pink Ladies cook quickly, maintain their shape well, and have the right amount of acid with sweet taste. A little cinnamon, lemon, and brown sugar is all you need to enhance their naturally good flavor.

I have included my sister Carole’s pie crust recipe. It is easy and turns out every time. Presidents’ Day is coming up before you know it, but don’t wait until then to make this.
Apple Filling
8 largePink Lady Apples
1 tablespoon fresh lemon juice
1 teaspoon cinnamon
¾ cup brown sugar
½ cup granulated sugar
4 tablespoons corn starch
Wash and peel the apples. Slice the apples in half and then with a pairing knife cut out the ends.


With a melon baller, remove the center with the seeds. Place the apples cut side down on a cutting board and slice them into about ¼ to 1/8th inch slices. Place the apples with all the other ingredients in a large dutch oven and slowly heat the apples. As the sugars and cornstarch dissolve, stir the apples with a wooden spoon. Cook apples gently until the juice begins to bubble and starts to thicken. Turn off the heat and the apples are ready to place in the crust.
Pie Crust
3 cups unbleached flour
1 teaspoons salt
1 teaspoon sugar
1 cup vegetable shortening (Crisco no Trans fat comes in premeasured cubes)
1 egg
1 tablespoon white vinegar (like Heinz)
6 tablespoons ice water
To assemble the pie crust, place the flour, salt, and sugar in a medium bowl, stir together. Add the shortening and with your hands or a pastry cutter, cut in the shortening until the dough looks clumpy, about the size of peas with some whole bits of shortening still visible. Whisk the liquids together in a separate container and then add them to the flour mix. Stir for a moment with a fork. Press the dough together using your hands. Form a large ball with out kneading and minimal mixing. Divide the dough into two pieces and form 2 discs.

Take a handful of extra flour and dust the work surface. The work surface should be stone or wood. Flour the rolling pin as well. Place the dough in front of you, with the side of your hands; flatten the ball into a disc and make parallel indentations going one direction and then the opposite direction. You will have a cross hatch.

Using the flour dusted rolling pin, start rolling out the dough up and down taking care not roll off the edge. Next, lift the dough, scatter some more flour under it, and give it a 90 degree turn. Now roll the other direction. Lift the dough again to make sure it is not stuck to the surface. Continue rolling from the center to the outer edges of the dough to form a circle around 13 inches in diameter.
Fold the circle in half and then again in quarters. Take the center point and place it at the center of you pie plate (I like a 9 inch glass deep dish). Unfold the pie crust until it fills the plate and overhangs the edge a bit. Gently press the dough into the corners. There should be an ample overhang of dough to roll under into a neat ridge.


Next, place the apple filling in the dough lined pie plate. Place the apples so that you can fill the space really well. Mound them up in the center. Repeat the step for rolling out pie dough with the second ball of dough. This will be the top crust.

Unfold the top crust onto the filled pie. Match up the edges and with a small knife and trim around the edge leaving about a 1 inch overhang. With your thumb and forefinger, seal the top and bottom crusts together as you roll them under into a thick edge. With your thumb or a dull end of a knife, shape a twisted edge with the crust. Cut a small cross in the center of the top crust. Make some little slits randomly around the rest of the top for steam vents. Dust the top crust with a teaspoon of granulated sugar.

Place the pie on a baking sheet and place the baking sheet into a preheated 400º oven. The pie will bake for around 1 hour. If the crust gets very brown, turn the heat down to 350º. The pie is ready when all the crust is golden and liquid is starting to bubble up and ooze out from the steam vents.

Let the pie cool before serving.


Hi Linda: Your Pink Lady Pie is Wonderful . . . . WOW!
Please contact me via the email above.
Thanks,
Alan Taylor, Marketing Director, Pink Lady America LLC
Made this pie today since I had a peck of Pink Lady apples. Turned out wonderful. Thanks for the recipe!
Hello. I like to think I’m a pretty fantastic baker. hahaha, but I just could not make a pie crust worth using, except maybe as a frisbee. Well thank you, to you and your sister , I am a master at making a pie crust. Thank you, thank you , thank you .