Next week is the Jewish holiday of Shavuot. Traditionally dairy meals are served for the holiday. 
 This presents a unique opportunity to create dinner menu’s with cheese, butter and other dairy ingredients. The best part of Shavuot is if you have a kosher home, where usually holiday meals involve meat or chicken, which can not be served with dairy, this dairy holiday tradition gives an opportunity to serve fabulous desserts made with real butter, cream cheese, whipped cream and the like.
These recipes are wonderful for Mother’s Day, Father’s day brunch, Graduation and all the other traditional things that kick off the Spring-Early Summer season.
One of my all time favorites is a coconut layer cake with cream cheese frosting that I modified a little from an old Bon Appetit recipe from at least 15 year ago. I looked on Epicurious but was unable to find it in the archives, I am glad I have it in my records. The other two desserts are both cheesecakes, the first one a classic that you can top with any fruit and any glaze you prefer. I don’t particularly like graham cracker crusts so I use all ground pecans and butter for the crust. The second cheesecake I made up based on my flavor preferences for dark chocolate and orange. I was inspired when I stopped in the market and found that Valrhona has a new chocolate bar out with a kosher mark (hechsher) that is dark chocolate with bits of orange peel in it. So delicious.
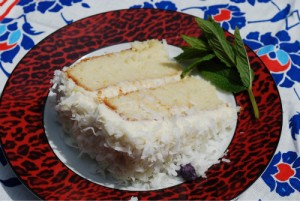
Coconut Layer Cake With Cream Cheese Frosting
Coconut layer cake is so rich and satisfying it is hard for anyone to resist. Creamy smooth, frosting covered with chewy coconut blend together with dense velvety cake layers to form a confection with a satisfying mouth feel and an indulgent taste. Serve this for dessert when you want to make a great impression. It is truly beautiful to look at.
Cake Layers
2 & 3/4 cup unbleached flour
1 teaspoon baking powder
1/2 teaspoon baking soda
1/2 teaspoon salt
2 tablespoons fresh lemon zest
1 & 3/4 cups granulated sugar
1 cup (2 sticks) unsalted butter, room temperature
1 cup canned, sweetened, cream of coconut, Coco Lopez, stir before measuring
4 large eggs, separated
1 teaspoon vanilla
1 cup buttermilk
1 tablespoon fresh lemon juice
Pinch of salt
Frosting
2 eight ounce packages cream cheese, (not whipped, or light) room temperature
1/2 cup unsalted butter (1 stick), room temperature
1/2 cup sweetened cream of coconut (coco Lopez)
1 teaspoon vanilla
2 cups sifted powdered sugar
4 cups of sweetened shredded coconut
Preheat oven to 350º. Butter and flour two 9 inch cake pans with 2 inch sides. Whisk flour, baking powder, and baking soda, 1/2 teaspoon salt and lemon zest in a medium bowl to blend. Set aside.
In the large bowl of an electric mixer beat butter, sugar, and sweetened cream of coconut until fluffy. Beat in egg yolks, and vanilla. Add in the buttermilk and blend. Combine the dry ingredients on low speed, just until blended.
In a separate bowl using a whisk or balloon whip, beat the egg whites with a pinch of salt until stiff. Carefully fold the egg whites into cake batter until barely blended. Divide the cake batter evenly between 2 pans. Level the cake batter and place the pans in the preheated oven. Bake about 45 minutes or until a tester comes out clean. A tester is a long toothpick that you carefully insert and remove in the center of the cake layer you think is done. Check the toothpick, if it comes out clean then the cake is done. If it comes out wet, the cake is still not ready. If it comes out with moist crumbs, you need just a couple more minutes. Cool the cakes layers on racks for ten minutes then run a sharp knife around the sides. Invert cakes onto racks and remove the cake pans. Let the cake layers finish cooling.
For the frosting, place the cream cheese in a mixer bowl and beat until fluffy then add the butter and blend. Add the sugar, Coco Lopez, and vanilla, and blend. Shake the Coco Lopez before measuring as it settles in the can.
Place one cake layer on the serving cake plate. Spread 1 cup of frosting on cake. Sprinkle 1 cup of shredded sweetened coconut on top of the frosting. Top this with the second layer. Spread the rest of the frosting on the top and sides. Sprinkle with the remaining 3 cups of coconut. Press the coconut into the frosting so it adheres. Keep refrigerated. Bring to room temperature before serving.
 Dark Chocolate Orange Cheesecake
1 10 inch springform pan
Crust
2 cups crushed chocolate cookies
5 tablespoons melted butter
2 teaspoons grated orange zest
Cake
12 ounces bittersweet chocolate with orange bits Valrona Manjari Orange, chopped
5 (8 oz.) packs cream cheese (40 ounces total)
1 tablespoon orange syrup (optional)
3 tablespoons fresh orange zest
1 and 2/3 cup granulated sugar
5 extra large eggs
2 teaspoons vanilla
Chocolate ganache
1 cup whipping cream
8 ounces of bittersweet chocolate
2 teaspoons light corn syrup
1 heavy bottom sauce pan
Chocolate leaves for decoration.
This cake works best if you start 3 days before you plan to serve it. Place crushed cookies into springform pan, add zest, and melted butter. Mix the cookies and butter with gloved fingers and pat into bottom of the pan.
In a mixer beat cream cheese until fluffy add sugar, zest, vanilla, and orange syrup. Add eggs in one at a time. Beat until very smooth, stopping to scrape down the sides of the bowl. Blend in the melted and slightly cooled chocolate.
Next, pour batter into prepared springform pan. Set pan on a baking sheet to avoid drips in the oven and bake at 350ºF. for around 45 to 55 minutes. The cake will be slightly puffed but will deflate as it cools, leaving a shallow well in the middle for the ganache. Remove the cheesecake from the oven and set aside to cool. Refrigerate overnight.
Next day prepare the ganache. Start by heating whipping cream in a saucepan until very hot but not boiling. Stir in chopped chocolate and corn syrup. Let this chocolate mix sit for 5 minutes and then stir until smooth and glossy. Let ganache cool. As the ganache cools, take a sharp knife around the perimeter of cheesecake and release the spring form pan. Remove the sides of the cheesecake pan and place cheesecake on your cake plate. Pour the cooled ganache into the shallow indentation in the center of the cake.
Refrigerate cheesecake until chocolate is set and cake is cool. Decorate with chocolate leaves, curls or other chocolate or candied orange peel type decoration.
 My Favorite Cheese Cake
Crust:
2 cups ground pecans
5 tablespoons of melted unsalted butter
Filling:
5 eight ounces packages cream cheese, room temperature
5 eggs
1 2/3 cups sugar
2 tablespoon fresh lemon juice
2 teaspoons vanilla
Topping:
2 cups sour cream
1/4 cup sugar
1 teaspoon vanilla
Strawberry glaze:
1 quart strawberries
1 12 ounce jar raspberry jelly
Preheat the oven to 350º. Combine pecans and melted butter and press onto the bottom of a 10 inch spring form pan to form the crust.
In mixing bowl of a stand mixer beat cream cheese until it is smooth and fluffy. Add in sugar, eggs, lemon juice, and vanilla. Beat until smooth. Pour cream cheese batter into the crust. Set pan on a baking sheet to catch any dripping butter. Place cheesecake into the oven.
Bake for 40 to 45 minutes until puffed and golden. Remove cake from oven and let it sit for 15 minutes while you prepare the topping. Leave the oven on.
For topping, stir sour cream, vanilla, and sugar together. After 15 minutes, carefully spread topping on hot cake, leaving a 1/2 inch border at the edge. Return cheesecake to oven for 5 more minutes. Remove from oven and let the cake cool. Refrigerate for at least 24 hours or 2 to 3 days for best results.
Several hours before serving, wash and stem the strawberries. Dry them on paper towel completely. Using a sharp knife, go around the perimeter of the cheesecake, release the spring form pan, and remove the cake. Place the cake on a serving platter. Place the strawberries, cut side down on the cake. Don’t worry if there are cracks in the top of the cake they will be covered with the berries and jelly.
In a small sauce pan or in a glass bowl in the microwave melt the raspberry jelly. Using a pastry brush paint a little jelly on the top of berries to make them shiny. Refrigerate the cake until serving time. I put the berries and glaze on the cake on the day I am going to serve it. You can make the cheesecake 3 days ahead and put fresh berries on it the day of serving. Enjoy.


Hi Linda,
All the recent recipes are wonderful!!! I want to try to make the bean and cheese pupusas and curtido. Thanks for the detailed directions and pictures. The California salad looks wonderful. The dairy desserts are amazing. Did you make the chocolate leaves? I have never seen them before. All the desserts look so professional. Also do you have a square springform pan?
Continuing to enjoy your website and looking forward to your beautiful posts.
Norma
Hi Norma, Yes, years ago I had a dream one night to invent a square spring form pan but I never acted on it. I guess someone else had the same idea since I found this pan a couple of years ago! I think i purchased it at Williams Sonoma. The chocolate leaves are a bit delicate to make but not really hard. Pick about 15 Camelia bush leaves. Pick the older thicker leaves with a little stem. Wash and dry them carefully. Melt some good quality dark chcolate in the top of a double boiler. Take a small spoon and dip it in the chocolate, spread as thick a layer as you can on the back side of each Camelia leaf, just exactly to the edge. Place the leaves, green side down carefully on a wax paper lined baking sheet and freeze them. When the leaves are frozen take the baking sheet out of the freezer and with cold hands carefully peel the actual green leaf away from the chocolate. They are quite delicate so be careful. Good luck. Linda
Lh…my…heavens…these look absolutely gorgeous. I’m sure they taste amazing, too. Before I try to make any of them, though, I think I need to lose about 5 pounds or so, so I can truly enjoy the results. The dark chocolate leaves is such a beautiful, visual touch. Thanks, as always, for sharing.